David Leadbetter Has Created a New Golf Swing That Will Blow You Away
Over four decades of teaching this game, I’ve come to realise the majority of golfers struggle to consistently play well because of issues with the backswing. For most, the conventional backswing is difficult to master and repeat, and when it goes bad, so goes the ability to synchronise the arms and the body during the swing – the most important factor in hitting consistent golf shots. If the synchronicity is off, the downswing becomes a rescue mission to get the clubface squarely on the ball. Top players through talent and practice can get by with compensations, but most golfers, if they aren’t in sync, really struggle.
Knowing this, I set out to find a way to make the move to the top simpler, more efficient and easier to repeat, so the downswing could be largely a reactionary event. After all, the downswing happens in the blink of an eye. If you can get into a good position at the top, you’ll have a much better chance of being in a good position when the clubhead meets the ball.
It took several years to conceive, study, design, refine and test (including putting it through the paces at a biomechanist’s lab) but I’m happy to say I’ve developed a new way to swing that does make the backswing simpler. And that helps improve the efficiency of the entire motion. I’m convinced this new technique will help a great many people play better golf. I call it the A Swing.
The “A” stands for “alternative,” because it’s great for players struggling with the conventional swing. My new book, The A Swing: The Alternative Approach to Great Golf, details what makes the swing effective and how easy it is to implement. In the meantime, I wanted to give you, the reader, a preview of what it’s all about.
I’ve had a long relationship with this magazine, and golf aficionados like you are a big reason I still find joy in teaching and coming up with better ways to play the game.
Great players of the past have displayed traits of the A Swing. In fact, it’s a culmination of what I’ve learned during my entire career. It borrows from things I used to discuss with world No.1s Nick Price and Nick Faldo, as well as current players, like Lydia Ko. It also stems from studying the motions used in other sports, such as baseball and tennis. And as I mentioned earlier, there’s real science behind it.
So now that we’ve got the drumroll out of the way, let’s look at the A Swing. If you’re struggling, give it a try. You might just find your A game with the A Swing.
THE A SWING START TO FINISH
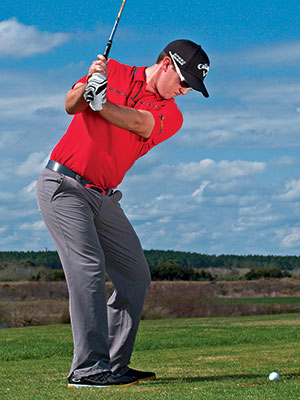
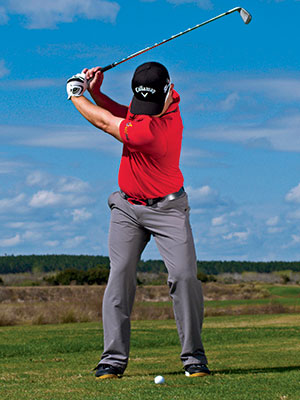
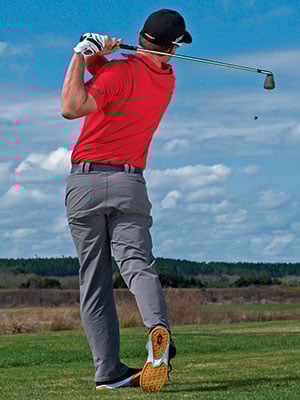
Here are two views of my student Ryan Blaum demonstrating the A Swing. Ryan plays on the Web.com Tour and has adopted the A Swing to great effect.
If you do a quick scan above, you might think it looks a lot like the conventional swing. In many spots it does, as I haven’t strayed too far from things I’ve always taught. But if you look closer, you’ll notice Ryan doing things that are far from conventional.
His backswing is much steeper than you see with most pros. His arm swing is shorter, but he is fully wound. There is no conscious effort to get the club swinging inside and around the body, even though the left arm is across the chest.
At the top, the shaft points to the right, which differs from most instruction. This backswing, in traditional terms, would not be called “on plane.” But I’m convinced it makes it easier to drop the club on the correct plane coming down. At halfway down, you can see the shaft has shallowed considerably from the backswing. It’s the opposite of the millions of steep, over-the-top downswings we see. A shallow downswing ensures that the club approaches from the inside, and then it’s just squaring the face to hit a draw.
This motion adds “swing” to the swing. It’s natural, and makes synchronising the downswing easy, leading to greater consistency.
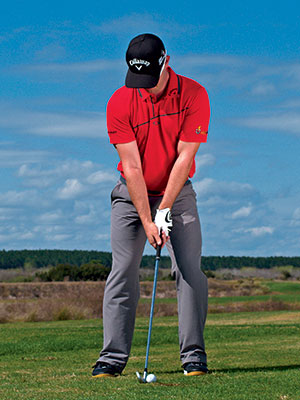

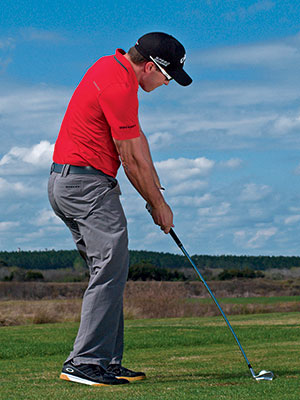
1. ADDRESS
The A Swing starts from a fairly standard setup. One difference is, the right foot is pulled back, creating a closed stance. Everything else is aligned parallel with the target line. Closing the stance helps get the club on the correct plane in the downswing.
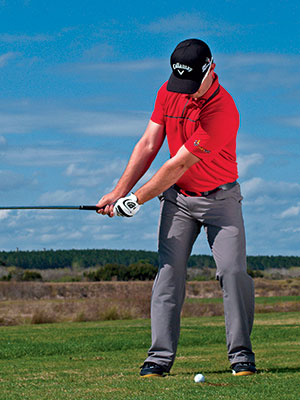
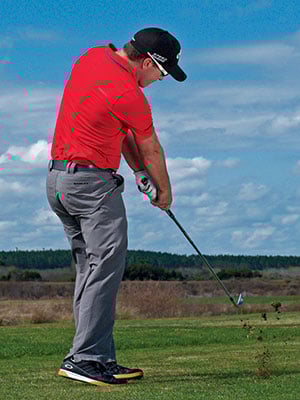
2. TAKEAWAY
The first move off the ball is very simple and is initiated largely by the core muscles coiling the torso away from the target. The clubhead tracks back outside the hands, and the right arm stays above the left.
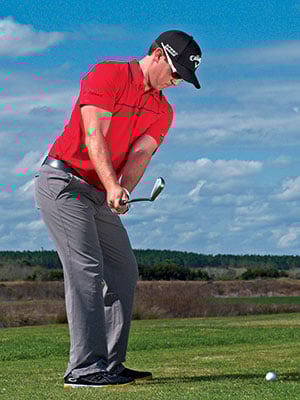
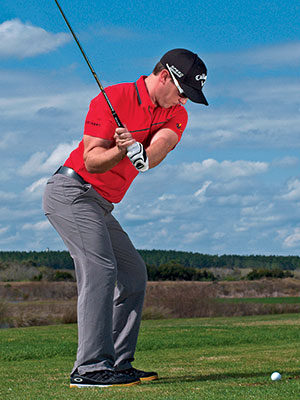
3. BACKSWING
As the left arm reaches parallel to the ground, the right wrist is hinging and moving the shaft onto a steep angle. This is a real difference of the A Swing: working the shaft into an inverted position.
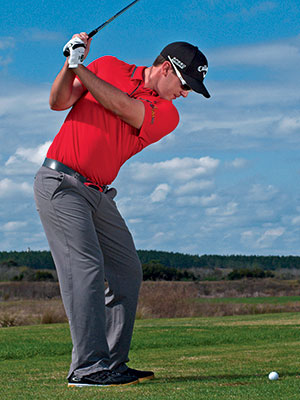
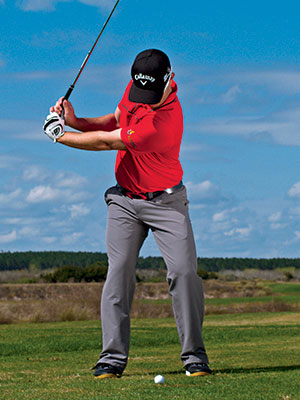
4. TOP OF THE SWING
The clubface points at the ball for much of the backswing (a closed face position) but at the top, it’s back to neutral. The A Swing grip (see next page) in large part controls what the face is doing. The backswing is shorter than that of the conventional swing, but testing shows no loss of power.
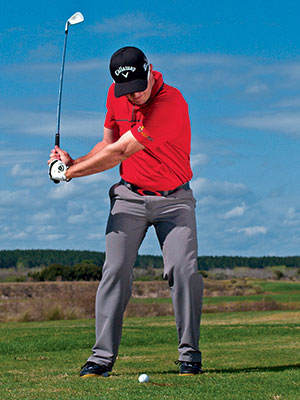
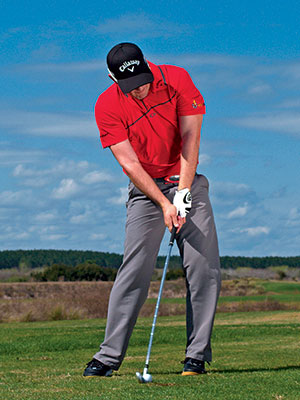
5. DOWNSWING
The beauty of the A Swing is that the downswing is essentially reactionary. Before the backswing is complete, the lower body makes a small shift toward the target. This helps the club drop onto a shallower, more horizontal plane, like the shaft angle at address. Picture a baseball batter stepping into a pitch. It’s a fluid motion: Weight shifts forward, club drops.
6. IMPACT
As the torso starts to unwind, the weight fully shifts to the front side. The left forearm and right palm drive towards the ground to square the clubface. At impact, the right wrist is cupped, or bent back, and the left wrist is flat and facing the target. The hands are well ahead of the clubhead.

7. POST-IMPACT
The right forearm does not roll over the left as it does in a conventional swing. Eventually the right wrist releases into a bowed position as if you’ve just thrown a ball sidearm. At the same time, the left wrist returns to a cupped position, much like it was during the backswing.

8. FINISH
The finish position looks similar to that of a conventional follow-through. The body rotates as much as it can and then the arms and hands wind the club around the back. It’s balanced and relaxed.
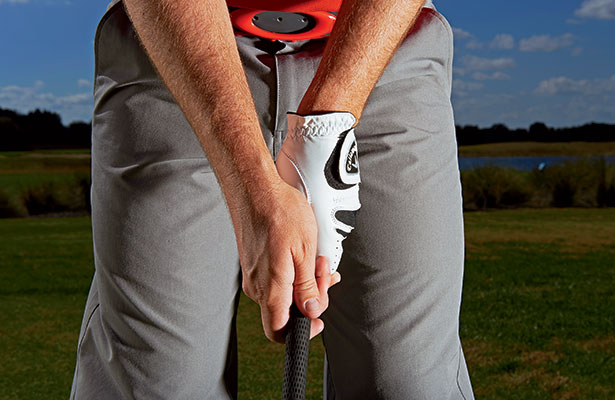
THE A SWING STARTER KIT
To perform it correctly, the A Swing requires a special grip. I call it the prayer grip. Why? If you hold the club up with this grip so the shaft is pointing to the sky, the hands and wrists should have a symmetrical, slightly cupped look – like you’re praying. This grip allows you to hinge and cock the wrists without rotating the clubface open going back and to generate maximum speed at impact as you release the right hand. You can hold the club with an interlocking, overlapping or baseball grip.
Here’s what you need to do:
1. Set the handle of the club diagonally across the fingers and just into the palm of the left hand. The grip should sit against the crook of the forefinger. The first knuckle should protrude as if resting on a trigger.
2. Now put the right hand on top of the left so the lifeline in the right palm covers the left thumb. Wrap the fingers of the right hand around the grip, and let the right forefinger separate a touch from the middle finger so it also appears to be on a trigger. The thumbs should be parallel to each other and appear stacked.
3. Check the forefinger lines. The base of the left forefinger (imagine a line from the big knuckle to the first joint) should point to the right eye. The base of the right forefinger should point to the left eye.
4. Hold onto the club lightly (estimate a 3 or 4 on a scale of 1 to 10, with 10 being the tightest). Sense almost no pressure on the middle section of the grip. But feel a little squeeze with your fingers at the top and bottom.
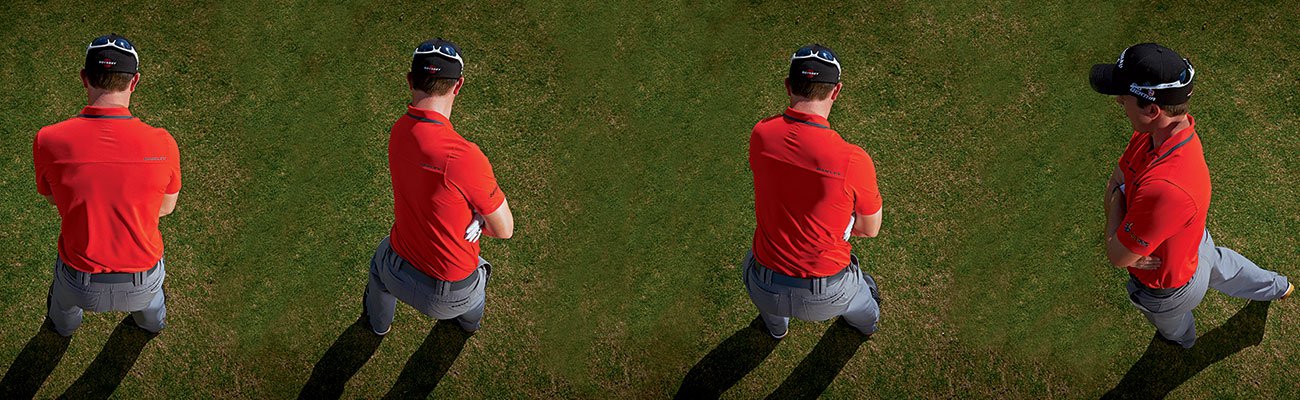
PRACTISING THE PIVOT
How the body winds going back and unwinds as the club moves down and through impact is the lifeblood of the A Swing. It’s the key to synchronisation, and being in sync is what makes the A Swing special. The body creates energy, then sequentially passes that energy to the arms, hands, club and finally to the ball. The easiest way to learn how to pivot is without a club, because it focuses your attention on how the body should move and not what’s going on with the swinging elements.
Follow these steps:
1. Get into the address posture without a club, and rest the hands on the sides of the stomach as if giving yourself a hug. The spine should be tilted slightly away from the target.
2. Simulate the backswing while keeping the arms folded. As the upper body winds back and you feel pressure building in the right heel, the left shoulder tilts towards the ground and the right hip rises slightly.
3. Transition into the downswing by unwinding the lower body towards the target with a slight lateral shift as you are still winding the torso away from the target. Feel the body weight move to the front of the left foot.
4. Just like in a traditional downswing, rotate the hips and torso towards the target. Feel the downward pressure in the feet moving into the left heel. Finish in balance, up on the toes of the right foot.
UNDERESTIMATING THE V PLANE
Instructors have been forever telling golfers they should keep the club on the same plane going back and coming down to hit solid, straight shots. I believe this is too difficult for most people to do on a consistent basis. It’s much easier to go from a steep swing plane on the backswing to a shallow one on the downswing. This notion is backed, in part, by the swings of some of the all-time greats, such as Jack Nicklaus and Johnny Miller. They had varying degrees of a steep-to-shallow move. This shape also gives the swing a great flow. The shaft drops from a steep position going back so that by halfway down it’s essentially parallel to the plane that the club started on at address. The shaft positions at halfway back and halfway down form the letter V [below], so I call it the V plane.
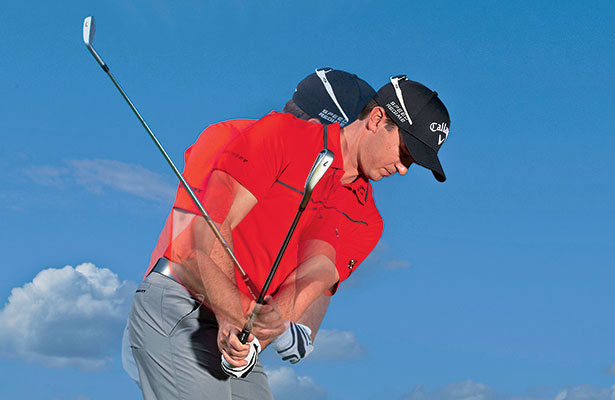
Here’s how it works:
1. Swinging back, the left arm stays pinned to the torso and the right arm remains above it. The right wrist hinges the club up steeply. The left wrist remains cupped, and the right biceps pinch the right side of the chest. At halfway back, the shaft angle nearly matches the spine.
2. Coming down, the lower body glides towards the target (the first move down) which helps the club fall onto a shallower plane. Then the torso rotates forward and the right elbow drops towards the right hip, setting up the most solid strikes of your life.
Adapted from
THE A SWING: THE ALTERNATIVE APPROACH TO GREAT GOLF. Copyright © 2015 by David Leadbetter with Ron Kaspriske. Published by St Martin’s Press.